Tuesday, 10 August 2021

Attaching Schrader Valves: The Permanent Access Solution

SAFETY MESSAGE: Brazing Schrader valves involves using high-heat torches near flammable refrigerants (like R600a) and oil. Ensure the system is completely empty and "purged" with nitrogen or air before applying heat. Always remove the internal valve core before brazing to prevent the rubber seals from melting.

If you want to move beyond temporary "piercing" valves, brazing a permanent Schrader valve (access fitting) to the suction line is the professional way to go. This allows for clean, leak-free pressure testing and charging for years to come.

Two Ways to Connect:

  1. The "Bullet" Piercing Valve (Temporary): Clamps onto the pipe and pierces it with a needle. Good for a quick diagnosis, but prone to leaking over time.

  2. The Brazed Schrader Fitting (Permanent): A 1/4" copper tube with a threaded valve head that is soldered directly into the compressor’s "process" or suction line.

Key Diagnostic Tips:

  • Remove the Core: The most common mistake is leaving the Schrader core (the little pin inside) in while brazing. The heat will melt the tiny rubber gasket, causing an instant, invisible leak the moment you try to charge the system.

  • The "Process Tube" Advantage: Most compressors have a short, pinched-off copper tail called the "process tube." This is the best place to attach your valve—it’s designed specifically for factory charging.

  • Surface Prep: Refrigeration pipes are often greasy or painted. Use an emery cloth or sandpaper to clean the copper until it shines like a new penny. Solder will not stick to dirty pipe.

Step-by-Step Installation:

  1. Preparation: Use a tubing cutter to remove the pinched end of the process tube. Ensure no copper shavings fall into the compressor.

  2. Cleaning: Sand the last inch of the compressor tube and the base of your Schrader fitting.

  3. The Internal Core: Use a valve core tool to unscrew and remove the rubber-sealed core.

  4. Brazing: Use an oxy-acetylene or MAPP gas torch. Apply heat to the thickest part of the joint first. Once the copper turns cherry red, touch the silver solder (brazing rod) to the joint. It should flow instantly into the gap via capillary action.

  5. Cooling & Reassembly: Let the joint cool naturally (don't quench with water). Once cool, thread the core back in and tighten with your tool.

Removable line tap type Schrader valve , look for the best place to fit one on the pipe work most of these valve fit to 6mm to 8mm copper pipe. I would recommend you measure this first as if it does not fit your in a bit of a mess.
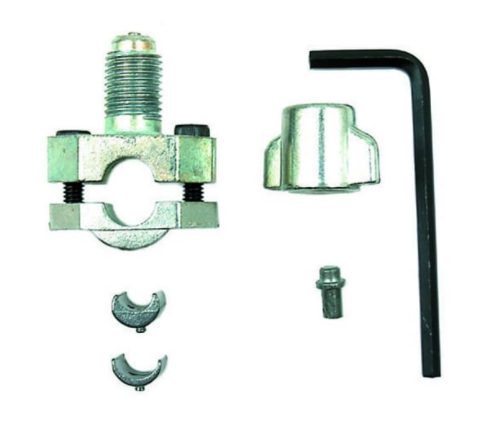

Fridge freezer refrigerator repairs , attaching a schrader valve for re-gassing

Ensure the collar is an exact tight fit to the pipe work , bent or misshaped piping can cause leakage.

Assemble the valve around the collars on the pipework and tighten the two clamping screws / bolts 

Wind down with equal turns on each side to prevent damage to pipe and an equal seal all round do not over tighten as to damage or misshape the pipework.  


Once in place tight enough for its purpose and your happy everything looks good you can now pierce the pipe , to do this you screw the cap on with the plunger fitted this then pushes the pipe piercing tool into pipe


Sometimes it may not be possible to fit the line tap version and you need to fit a fixed Schrader valve to the charging port on the compressor.

lokring Schrader 

Before cutting the pipe prepare the surfaces as it is easier emery cloth the out side and make it clean, paint free and smooth.

Measure the pipe before cutting and ensure you have the correct sized lokring. 


Fridge freezer refrigerator repairs , attaching a schrader valve for re-gassing

When you have cut the pipe work prepare the surfaces more for the joint. Apply some prep fluid to clean the surfaces. Fully insert both pipes ends into the lokring and use the lokring tool to tighten the fitting onto the pipework. 

Remember R600a in flammable so this type of cold pipe working is preferred as to the older braising at high heat. But they can be very expensive especially when fitting a new compressor with all the connections and then to regas system it can work out too costly for some.


Monday, 9 August 2021

Troubleshooting Ice Makers: Why Your Fridge Stopped Making Ice

SAFETY MESSAGE: Ice maker repairs involve both water and electricity in close proximity. Always unplug the refrigerator and shut off the water supply valve before attempting any disassembly. Be aware that the heater element in the ice mold can be extremely hot during the harvest cycle.

An ice maker is a complex "mini-appliance" inside your refrigerator. It relies on a perfect sequence of events: water filling, freezing, heating the mold, and ejecting the cubes. If just one part of this mechanical dance fails, you’re left with an empty bin.

Key Diagnostic Tips:

  • The "Hollow Cube" Symptom: If your ice cubes are small or hollow, the water inlet valve is likely partially clogged with mineral deposits or the water pressure is too low.

  • The Frozen Fill Tube: This is a classic fault. If water drips slowly, it freezes inside the fill tube before reaching the tray, creating an ice plug that stops all production.

  • Mechanical Jams: Sometimes a single cube gets stuck in the ejector blades, causing the motor to stall. Check for "stray" ice pieces that might be blocking the arm's movement.

Improved Repair Strategy:

  1. Check the Temperature: Your freezer must be at or below -15°C (5°F) for the ice maker to cycle. If the freezer is too warm (even if food is still frozen), the thermal switch won't tell the ice maker to start.

  2. The "Optic" Test: On many modern fridges, an infrared beam detects if the bin is full. If the "emitter" or "receiver" lens is dirty or blocked by a stray piece of ice, the system will think the bin is full and shut down.

  3. Test the Inlet Valve: Use a multimeter to check the solenoid valve at the back of the fridge. If it has no continuity, the valve is dead and won't let water in, even if the ice maker is asking for it.

  4. Manual Harvest: Most ice makers have a "Test" or "Reset" button. Pressing this forces a cycle. If the tray turns but no water enters at the end, the problem is definitely the water valve or the supply line.

Usually found on high end units, it freezes ice cubes ready for appliance owners when needed. it will be located in the freezer unit to take advantage of the freezing temperatures.


Fridge freezer refrigerator ice makers


These units need to be connected to the cold water mains connection in order for the ice to be renewed. 

The temps in the ice make are monitors by an NTC sensor  and when the ice is required a motor with turn the tray to free the ice up ready for dropping into the glass required. An arm on the front of the ice maker makes sure that the ice does not overfill .

These unit usually have a test button on them so they can be tested when needed, its a common failure to see the tray snap from the maker this would water to spill over the food in the unit so is usually spotted quite quickly.

You could get a motor failure or a failure in the control side of the system so test for power at the motor prior to replacing and ohm test the motor to see if it is faulty as well. If the arm that stops the ice maker broke it could continuously make ice even when not needed this can be a costly fault so keep an eye out for damage.


Test motor for ohms resistance reading 40 ohms for smaller motors , Test the micro switches , Test any fans for ohms and then test the NTC for ohms reading , ensure no shorts in the parts and look after service information on your model to check ohms readings.


Fridge freezer ice buckets 


Fridge freezer refrigerator ice makers


Ice from the ice maker is dropped into the these ice buckets and it then can be used to dispense the ice cubes to the appliance user. To dispense the ice a motor and large screw auger is used the motor turns the auger and the auger pulls the ice towards the exit. other than the screw failing or coming lose the only other problems could be freezing up or the motor failing. Sometimes there may be a solenoid fitted this is a switch to prevent crushing of the ice so either full cubes or crushed ice can be selected by user.

To test the motor take an ohms reading and match this to service specs for appliance make sure there are no shorts or earth leakage currents by testing for continuity.

Same thing for the solenoid if one is fitted 

The plastic bucket can weaken and crack over time if so replace it.


Understanding Climate Classes: Why Location is Everything

SAFETY MESSAGE: When selecting a location for your refrigerator, ensure the area is well-ventilated and away from heat sources like ovens or direct sunlight. If installing in a garage or basement, verify the appliance's Climate Class to prevent compressor failure due to viscous oil or overheating.

Ever wondered why some fridges struggle in a hot kitchen while others fail in a cold garage? The answer is the Climate Class. Every refrigerator is engineered to operate within a specific range of ambient (room) temperatures. If you step outside these bounds, your fridge won't just run poorly—it could suffer permanent mechanical damage.

Key Diagnostic Tips:

  • The "Viscous Oil" Trap: In cold environments (below 10°C), the oil in your compressor can become thick and sluggish. This prevents proper lubrication, causing the compressor to seize or burn out prematurely.

  • The Condenser Bottleneck: In a hot room (above 38°C), the condenser coils can't shed heat efficiently. The compressor will run 100% of the time, leading to massive energy bills and eventual component failure.

  • Energy Inefficiency: Using a "Normal" (N) class fridge in a "Tropical" (T) environment can increase electricity consumption by over 20% as the system fights to stay cool.

Standard Climate Class Table: | Class | Type | Temperature Range | Ideal Location | | :--- | :--- | :--- | :--- | |

  SN | Subnormal | 10°C to 32°C | Unheated basements / Hallways | | N | Normal | 16°C to 32°C | Standard indoor kitchen | | ST | Subtropical | 18°C to 38°C | Warmer climates / Sunrooms | | T | Tropical | 18°C to 43°C | High-heat regions (e.g., PH) |

Improved Repair & Placement Strategy:

  1. Check the Rating Plate: Before moving a fridge to a garage, check the sticker inside the door. If it says "N" or "ST," it will likely fail during a cold winter.

  2. The Garage Solution: If you must keep a fridge in an unheated space, look for "Garage Growth" technology or a model specifically rated SN-T, which covers the widest possible temperature range (10°C to 43°C).

  3. Ventilation Gaps: Regardless of class, maintain at least a 50mm (2-inch) gap at the rear and top. Without airflow, even a Tropical-rated fridge will overheat.

  4. Avoid "Heat Islands": Never place your fridge directly next to a dishwasher or oven. The localized heat can trick the thermostat into running the compressor unnecessarily.


Its worth noting that certain fridges are not going to function correctly out of there climate class for example most UK fridges are class N which means they are suitable for +16c to +32c , if the temps start to go above 32degrees Celsius then the condenser may struggle to lose its heat and the refrigeration cycle will be affected. Bear this is mind as it may be a problem in very hot spells or in the unit is fitted somewhere to hot for example a conservatory or in a kitchen with constant heat. So if you come across a recently moved or new appliance not functioning it may be because of the environment it is located.


Sunday, 8 August 2021

The Defrost Cycle: Why Your Fridge Needs a "Fake Summer"

SAFETY MESSAGE: Defrost systems involve high-wattage heating elements and moisture. Always unplug the appliance before testing components. Be extremely careful when handling the defrost heater, as it is often made of glass and can become incredibly hot or shatter if mishandled.

Modern "frost-free" refrigerators don't actually stay frost-free on their own. They use a clever trick: every 8 to 12 hours, the fridge temporarily turns off the cooling and turns on a heater to melt any ice on the evaporator coils. If this system fails, the ice builds up until air can no longer pass through, and your fridge stops cooling.

Key Diagnostic Tips:

  • The "Snowball" Effect: If you open your freezer and see ice poking through the back panel vents, your defrost system has failed. This is a "hard fault" that will not fix itself.

  • Heavy Running: If the compressor is running 24/7 but the fridge is getting warmer, the evaporator is likely "iced over," acting like a block of Styrofoam that prevents heat exchange.

  • The Floor Leak: If you see water pooling under the crisper drawers or on the floor, the defrost heater is working, but the drain tube is frozen or clogged with debris.

Improved Repair Strategy:

  1. The Continuity Test: Use a multimeter to check the Defrost Heater. If it shows "Open Circuit" (OL), the heating element is burnt out.

  2. The Bi-Metal Thermostat: This is the most common failure point. It’s a small sensor clipped to the coils. If it looks "bulged" or "swollen," it’s dead. It must be cold (below -5°C) to show continuity during a test.

  3. Check the Timer/Control Board: If the heater and thermostat are fine, the "brain" isn't sending the signal to start the cycle. On older fridges, you can manually turn the defrost timer screw until it "clicks" to force a cycle.

  4. The Steam Clear: Never use a hair dryer or heat gun—they melt the plastic liner! Use a steamer or bowls of hot water to melt the ice block before installing new parts.

Defrost heaters are fitted to units with automatic defrost systems they use a timer mechanical for older fridge freezer units and digitally controlled for more modern machines.

The heating element is just the same as any oven element.

A resistive element is encased in a insulated material and then surrounded by an outer metal protective casing.

Elements can fail and usually fail open circuit or Ol on the meter if intact you can work out the ohms reading by the wattage of the element and the volt with ohms law. With these elements is always good practice to insulation resistance test them to check for earth leakage currents.


Fridge freezer refrigerator Defrost heaters


These element need a timer to turn off and some sort of control be it a thermostat or a digital sensor. There is usually some sort of thermal cut out protection and a thermal cut out fuse is used to disconnect power if the device should overheat.


Fridge freezer refrigerator Defrost heaters


Thermal cut out fuses can be tested for continuity and replaced if blown remember to check for any reason the fuse blown maybe insulation resistance of element has failed or water ingress always best to check. When replacing the fuse make sure you fit it exactly where it was before to prevent nuisance tripping.

Fridge freezer refrigerator Defrost heaters


Old units will use a mechanical timer to turn the defrost element on-off today electronic programming is used.

Visually check to see timer operation to confirm its working or not if its not or its getting noisy in operation them replacement is only option.


Solving Refrigerator Circulation: Why Airflow is Everything

SAFETY MESSAGE: Air circulation issues often involve moving fan blades and electrical components. Always disconnect the refrigerator from the power supply before removing any internal panels or covers. Avoid touching fan motors immediately after operation, as they can become hot enough to cause burns.

A refrigerator doesn't just need refrigerant; it needs to "breathe." If the cold air produced by the evaporator doesn't circulate, you end up with a freezer full of ice and a fridge full of spoiled milk. Proper airflow ensures that the temperature remains consistent from the top shelf to the bottom crisper drawer.

Key Diagnostic Tips:

  • The "Blocked Vents" Culprit: The most common cause of poor circulation isn't a broken part—it's a large pizza box or a bag of frozen peas pushed directly against the air vents. This chokes the system and prevents cold air from reaching the fridge.

  • Ghost in the Machine: If you hear a high-pitched squealing or a "thapping" sound, your evaporator fan is likely struggling. This fan is responsible for pulling cold air off the coils and pushing it into the cabinet.

  • Uneven Temperatures: If your lettuce is freezing on the top shelf but your drinks are warm on the door, your circulation is "short-circuiting." This often happens when ice builds up in the air ducts connecting the two compartments.

Improved Repair Strategy:

  1. Clear the Airways: Maintain at least a 2-inch gap around the internal air vents. Organizing your fridge isn't just for aesthetics; it's for thermal efficiency.

  2. Inspect the "Damper" Door: In many models, a small motorized flap (the damper) opens and closes to let cold air into the fridge section. If the fridge is warm but the freezer is fine, check if this flap is stuck shut or frozen over.

  3. The Fan Spin Test: With the power off, try to spin the evaporator fan blade by hand. It should spin freely. If it's stiff or wobbly, the motor bearings have failed and the motor must be replaced.

  4. Seal Integrity: Circulation depends on a sealed environment. Check your door gaskets for gaps. If warm, humid air leaks in, it creates frost that eventually blocks the air passages, killing the internal circulation.

Modern or high end fridge freezer units often use fans some for circulation of the cold air from the freezer cavity to other cavities such as the fridge. There may also be cooling fans on a compact condenser as well to aid cooling of the refrigerant.

Fridge freezer refrigerator circulation and cooling fans


Fans will have motors to drive them on modern newer fridge freezers the motors are usually DC motors older fridge freezers used mainly AC motors so understanding both is a must when it comes to testing and fault finding.

AC motor generally used are shaded pole types which are usually very reliable , they are self starting, single phase induction motors. you can measure the windings of these to ensure they are intact otherwise it could be a bearing or the mechanical side of the fan that is at fault like a blockage or frozen solid . resistance reading are usually 800-900 ohms or thereabouts.

DC motors are usually BLDC brushless motors these need a speed sensor usually a hall effect sensor to now where in the rotation the rotor is so timing of rotating magnetic field can be controlled. The control is usually done buy a electronic motor drive board where speed and rotation can be controlled. Again these can be subject to mechanical fault and freezing solid , you can ohm test the coil windings and the sensors but its hard to locate and test the motor drive PCB.


Mastering the Diverter Valve: The "Traffic Cop" of Your Fridge

SAFETY MESSAGE: Handling refrigeration diverter valves involves working with the sealed system and delicate electrical solenoids. Always unplug the appliance before testing. If the valve requires replacement, it must be performed by a certified technician to avoid refrigerant leaks or flammable gas hazards.

If you have a "combined" fridge-freezer with only one compressor, the Diverter Valve (or Step Valve) is the unsung hero. Its job is to act as a traffic cop, switching the flow of refrigerant between the fridge evaporator and the freezer evaporator depending on which section needs cooling.

Key Diagnostic Tips:

  • The "Half-Cold" Symptom: The most common sign of a stuck diverter valve is when one compartment (usually the freezer) is ice-cold, but the other (the fridge) is warm, even though the compressor is running perfectly.

  • The Clicking Sound: When you first plug the fridge in, you should hear a faint "click-click-click" from the back. This is the valve initializing. If it’s silent or making a loud grinding noise, the internal gears or solenoid may have failed.

  • Pulse Testing: These valves are controlled by DC pulses from the main PCB. If the valve isn't switching, the issue could be the valve itself or a faulty signal from the control board.

Improved Repair Strategy:

  1. Check for "Default" Mode: Most valves are designed to default to the freezer if they fail. If your fridge section is warm but the freezer is -18°C, the valve is likely stuck in the "A" position.

  2. Magnet Test: Since these are solenoid-driven, a strong magnet can sometimes be used by technicians to manually "force" the valve to switch to see if the blockage is mechanical or electrical.

  3. The Coil Test: Use a multimeter to check the resistance of the valve coil. An "Open Circuit" (OL) reading means the solenoid has burnt out and the entire valve assembly needs professional replacement.

  4. Avoid Debris: Diverter valves have very tiny internal ports. If you’ve recently had a compressor burnout, carbon soot can clog the valve. Always ensure a high-quality filter drier is installed to protect this component.

This is used in more expensive models where a secondary evaporator is used to cool a second fridge freezer cavity, when the temperature reach a set point then the diverter valve with operate and allow refrigerant to flow to the second evaporator as well.


These valve use either synchronous motors or just a simple solenoid valve to open them when they are signalled.

What can go wrong with diverter valves 

If the secondary fridge freezer cavity is not getting cooled  but the primary is functioning ok then its a god sign the diverter valve may be faulty and its best to test it prior to replacing any parts as it could be a control issue and not a faulty valve, normally the fridges with these are fitted with self diagnostics and servicing modes where you can manually operate the valve to ensure all control function are fine.

Study up on the model your working on and see what information is available on the service modes and diagnostics.


The solenoid valves have a coil of wire and are easy to test just take a resistance measurement over the two terminals. Reading can be from 1-4 ohms but if you get Ol then the winding in damaged and needs replacement. Replacement means recovering and recharge of the system.


Fridge freezer refrigeration Electro - mechanical baffle

These are used where 2 or more compartments are cooled from one evaporator, it gives a degree of temperature control.


Fridge freezer refrigeration  Electro - mechanical baffle


The refrigeration system will be used to cool the freezer department and the air from the freezer used to cool other compartments usually with the aid of a circulation fan. When the baffle is signalled to open the fan will blow cold air into the secondary department and warm air rises to be cooled in the primary cavity.

Baffle are electro mechanical and require a signal from a temperature monitoring device and the associated sensors and electronics to provide control, some older units use a bellows type diagram that opens/close the baffles when a temperature is reached. 

The electric baffles use a small synchronous motor to move the baffle usually a reed or micro switch is fitted to tell the controller what position the baffle is in.

What can go wrong with these baffles 

If the primary unit is working fine and is freezing the cavity as normal then its a sign that the cool air in not getting into the secondary compartment for some reason, it could be a over freezing and a blockage, fan failure , or the baffle door could be frozen solid so confirm the parts are faulty before replacing do some test checks and inspections. If the fridge is getting too cold then the baffle door could be cracked or even frozen in the open position.

You can test the baffles motor for ohms with a multimeter if it tests OL it means the internal winding is damaged and you need to replace. Test the micro or reed switch as the same time to ensure continuity.